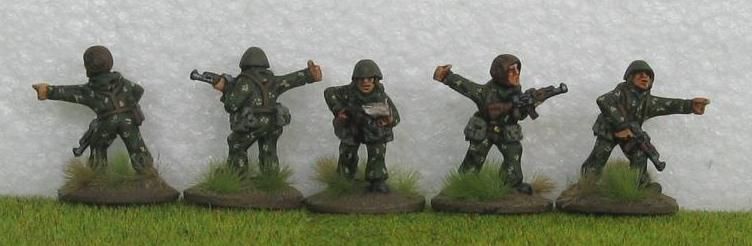
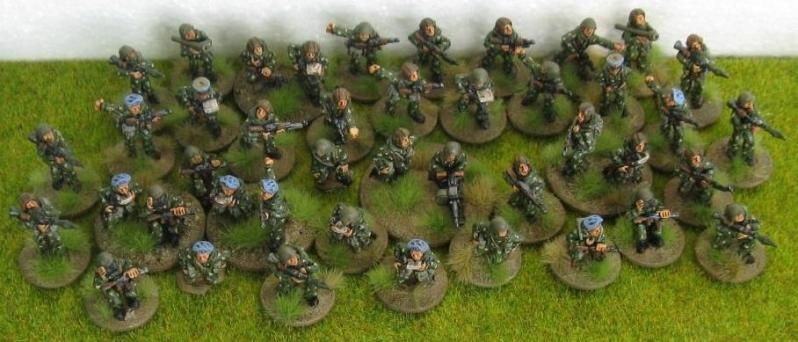
Part of my Cold War plan (and pretty much anyone's Cold War plan in my opinion) was to complete a VDV or Soviet Airborne force. In my case I eventually decided that I wanted to do a 1:1 VDV Company equipped with BMDs.
Happily I can now say that I have finished the infantry component of that exercise, and once I have sorted a couple of ZSU-23-2 and have got a SPG-6 I will have finished all the figures and just require a few final vehicles.
Hopefully that will be done in the next few months. But for now here are the reinforcements I have just finished.
First up my Company Commander and Zampolit:
Now a bunch of figures I'll be using as my FAC, FO's for artillery and mortars etc:
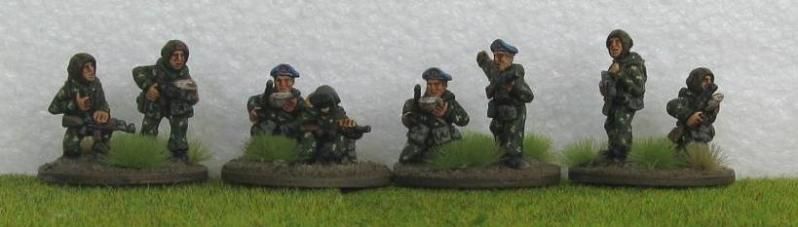
My final two SAM guys:
Some Platoon Leaders and Squad Leaders
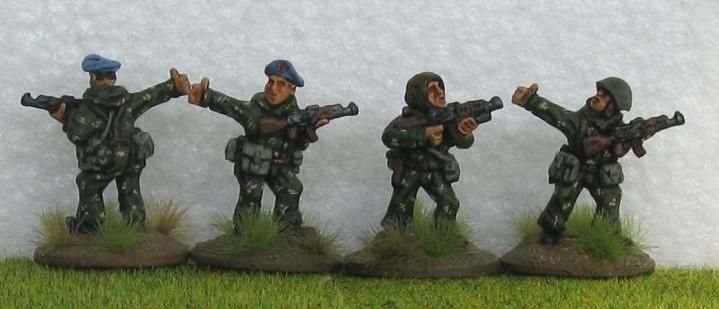
RPGs!
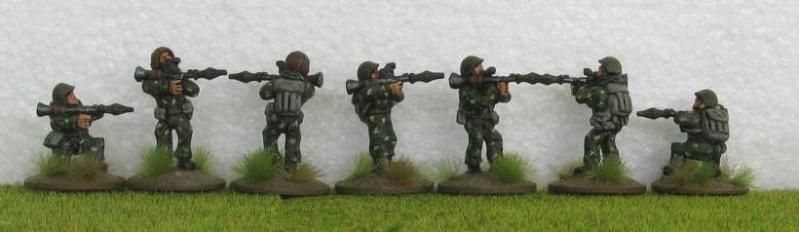
RPKs and a PKM
AGS-17
SPG-9 crew (waiting for their gun to turn up!):
Everybody
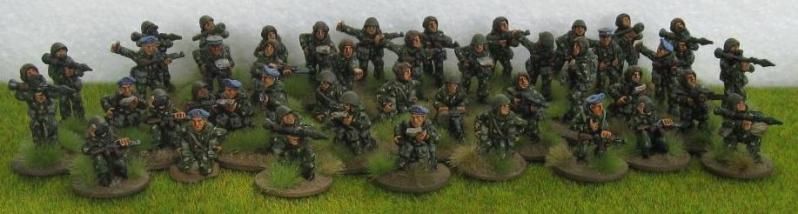
That's it!
Thanks
Richard
Tampilkan postingan dengan label Liberation. Tampilkan semua postingan
Minggu, 28 Oktober 2012
Selasa, 02 Oktober 2012
VDV Figure Stocktake
So... I've been painting up 40 odd Liberation Miniatures Soviet Paratroopers or VDV for the last week or so - hence no recent updates... I'd just finished 14 or so when I decided I'd better do a quick stocktake to see how I was faring in trying to complete a 1-to-1 VDV Company with some regimental assets.
So this basically means an HQ Section, with some attachments - FAC, FO, Sniper and Medic, a Grenade launcher Section and a Air Defence Section plus 3 Platoons of 3 squads each. Regimental assests are a couple of 120mm mortars plus their command team and mortar FO, plus an Anti-Armour section. At some point in the future I'll get a ZSU-23 AA gun or two as well.
Needless to say.... I probably should have done this little audit before I began this whole process.
To show you the result of my silly-billiness here a couple of awful photos:
and
So this basically means an HQ Section, with some attachments - FAC, FO, Sniper and Medic, a Grenade launcher Section and a Air Defence Section plus 3 Platoons of 3 squads each. Regimental assests are a couple of 120mm mortars plus their command team and mortar FO, plus an Anti-Armour section. At some point in the future I'll get a ZSU-23 AA gun or two as well.
Needless to say.... I probably should have done this little audit before I began this whole process.
To show you the result of my silly-billiness here a couple of awful photos:
and
OK - so like I said, not the greatest photos but they kind of prove what I was talking about. I was working on everything you can see stuck to soft-drink bottle caps. So the line of figures all across the top and all down the right hand side. Pretty much all of these appear to be no longer required..... AAaargghh!!!
Along with those there are 4 more figures on the bottom right hand side - No longer required!
So - what's the upshot of all this. Well to say the least my painting will be a little more focussed over the next week or two - and maybe - just maybe - I might have the infantry side of this unit essentially completed (at least figures wise) before the end of the Guild Task 5 group build.
Anyway - enough lamenting for now...
Back to work
Richard
Selasa, 01 November 2011
BAOR mid 1980's Stocktake
Well October was officially "No Blog Month" - my first month without an update. But I had a reasonable excuse - a holiday in New Zealand during the Rugby World Cup. Didn't get to any of the games - wrong part of the country - but did enjoy soaking up the experience. And have found the perfect retirement destination.
I'm not sure how much or how regularly I'll be getting updates up for the next little while either with real life and other competing events getting in the way of getting much done - and no one wants to read a blog of just waffle... so, we'll see what I can do.
Enough excuse making. I've needed to do a decent stocktake for a while now and find out exactly what I'm missing to complete my mid 1980's BAOR force. This force represents (in my imagination anyway) a 1-for-1 reduced mechanised company plus some attached Battalion assets.
Here is what I am currently able to field:

Here is the company + additional assets broken down a little diagramatically (and kind of amateurish manner as well!)

The Guide
(Things missing are in bold)
Green - Company CO, Radio Operator, Company Sergeant - should perhaps have more - need to investigate that further - FV432
Blue - Company 2IC, Radio Operator, Sergeant (?) - not sure about this one - need to investigate that further - FV432
Not sure about what other assets the Company HQ might be able to bring to the party - like a sniper section...
Purple - GPMG Sustained Fire Team - possibly party of the Company HQ - 2nd GPMG Sustained Fire Team
Yellow - 1st Platoon (from Right to Left)
Platoon Leader, RTO, Platoon Sergeant, Light Mortar, Medic
3 Sections
Fireteam A - Section Leader, MAW Gunner, Assistant Gunner, Rifleman
Fireteam B - Section 2IC, GPMG Gunner, Assistant Gunner, Rifleman
4 x FV432
2 FV432, 1 x MAW Gunner
Red - 2nd Platoon (from Left to Right)
Platoon Leader, RTO, Platoon Sergeant, Light Mortar, Medic
3 Sections
Fireteam A - Section Leader, MAW Gunner, Assistant Gunner, Rifleman
Fireteam B - Section 2IC, GPMG Gunner, Assistant Gunner, Rifleman
4 x FV432
White - ATGM Section
So far just the 1 Milan Team
Platoon Leader, RTO, Platoon Sergeant, 3 Milan Teams, 3 FV432, 2 Spartan MCT
Orange Brown - Mortar Battery
2 FV432M with mortar teams, Sultan & Spartan (not shown)
Light Blue - ADA Section
2 Blowpipe Teams - need to do further reseacrh on how these would have been transported, did they have command element etc.
Grey - Artillery
105mm light gun + crew, tractor (not shown).
105mm light gun + crew
2 x Abbot
2 x GPMG Turreted FV432 (for use as Platoon Leader vehicles - just to tell them apart)
So that's it for the stocktake. I now have a better idea of what's missing and what I need to pursue to finish off this unit. Fortunately, possession of a large number of FV432s will also help me with my next unit - but more on that next week
Have fun...
Richard
I'm not sure how much or how regularly I'll be getting updates up for the next little while either with real life and other competing events getting in the way of getting much done - and no one wants to read a blog of just waffle... so, we'll see what I can do.
Enough excuse making. I've needed to do a decent stocktake for a while now and find out exactly what I'm missing to complete my mid 1980's BAOR force. This force represents (in my imagination anyway) a 1-for-1 reduced mechanised company plus some attached Battalion assets.
Here is what I am currently able to field:
Here is the company + additional assets broken down a little diagramatically (and kind of amateurish manner as well!)
The Guide
(Things missing are in bold)
Green - Company CO, Radio Operator, Company Sergeant - should perhaps have more - need to investigate that further - FV432
Blue - Company 2IC, Radio Operator, Sergeant (?) - not sure about this one - need to investigate that further - FV432
Not sure about what other assets the Company HQ might be able to bring to the party - like a sniper section...
Purple - GPMG Sustained Fire Team - possibly party of the Company HQ - 2nd GPMG Sustained Fire Team
Yellow - 1st Platoon (from Right to Left)
Platoon Leader, RTO, Platoon Sergeant, Light Mortar, Medic
3 Sections
Fireteam A - Section Leader, MAW Gunner, Assistant Gunner, Rifleman
Fireteam B - Section 2IC, GPMG Gunner, Assistant Gunner, Rifleman
4 x FV432
2 FV432, 1 x MAW Gunner
Red - 2nd Platoon (from Left to Right)
Platoon Leader, RTO, Platoon Sergeant, Light Mortar, Medic
3 Sections
Fireteam A - Section Leader, MAW Gunner, Assistant Gunner, Rifleman
Fireteam B - Section 2IC, GPMG Gunner, Assistant Gunner, Rifleman
4 x FV432
White - ATGM Section
So far just the 1 Milan Team
Platoon Leader, RTO, Platoon Sergeant, 3 Milan Teams, 3 FV432, 2 Spartan MCT
Orange Brown - Mortar Battery
2 FV432M with mortar teams, Sultan & Spartan (not shown)
Light Blue - ADA Section
2 Blowpipe Teams - need to do further reseacrh on how these would have been transported, did they have command element etc.
Grey - Artillery
105mm light gun + crew, tractor (not shown).
105mm light gun + crew
2 x Abbot
2 x GPMG Turreted FV432 (for use as Platoon Leader vehicles - just to tell them apart)
So that's it for the stocktake. I now have a better idea of what's missing and what I need to pursue to finish off this unit. Fortunately, possession of a large number of FV432s will also help me with my next unit - but more on that next week
Have fun...
Richard
Selasa, 16 Agustus 2011
Soviet 120mm Mortar Teams
This week I've added a couple of 120mm Mortar teams to my Soviets.
As I understand it, the Soviets developed an excellent 120mm mortar just prior to WWII. It was such a good design that the Germans simply copied it. Since then it has been improved at least a couple of times, but the basic design remains the same. You can read a very brief description of this development process here and here and finally here. I'm going to "pretend" that my mortars are more likely to be the PM-43 variety rather than the 2B11 Sani developed in 1981, as I doubt all units would have them within the timeframe I'm dealing with and because the model I used is a WWII variant.
So...
For these teams I used Liberation VDV and Cam Jump Suit figures for the mortar crews. I found someWartime Miniatures 120mm mortars at Cancon earlier in the year (like January!) and thought they would look pretty good together. They are based on large GW round bases - 60mm I think... Here they are:


I'm basically happy with the result - but I tried something different with the basing and I'm not happy with that result. I won't be using static grass and Silfor tufts together again. I also don't have any 120mm mortar bombs or appropriate sized boxes which could have made the bases that much better...
Onto a couple of youtube clips:
This first clip is from WWII but as it is about a german copy of the Soviet 120mm mortar I thought it worth having here. It gives you a good idea of the size etc.
This is a clip about a modern US Marine's 120mm mortar - gives you a good sense of the size of the rounds in particular
That's all for now
have fun
Richard
As I understand it, the Soviets developed an excellent 120mm mortar just prior to WWII. It was such a good design that the Germans simply copied it. Since then it has been improved at least a couple of times, but the basic design remains the same. You can read a very brief description of this development process here and here and finally here. I'm going to "pretend" that my mortars are more likely to be the PM-43 variety rather than the 2B11 Sani developed in 1981, as I doubt all units would have them within the timeframe I'm dealing with and because the model I used is a WWII variant.
So...
For these teams I used Liberation VDV and Cam Jump Suit figures for the mortar crews. I found someWartime Miniatures 120mm mortars at Cancon earlier in the year (like January!) and thought they would look pretty good together. They are based on large GW round bases - 60mm I think... Here they are:
I'm basically happy with the result - but I tried something different with the basing and I'm not happy with that result. I won't be using static grass and Silfor tufts together again. I also don't have any 120mm mortar bombs or appropriate sized boxes which could have made the bases that much better...
Onto a couple of youtube clips:
This first clip is from WWII but as it is about a german copy of the Soviet 120mm mortar I thought it worth having here. It gives you a good idea of the size etc.
This is a clip about a modern US Marine's 120mm mortar - gives you a good sense of the size of the rounds in particular
That's all for now
have fun
Richard
Rabu, 05 Januari 2011
Happy New Year!!!!
Well 2010 sort of fizzled out with too much on to spend any time doing modelling, gaming etc - more's the pity - so I didn't get to post anything in the last couple of weeks of December.
I had a very nice Christmas, thank you very much and it was nice to have a few days off in a row.
Pressie-wise, the Cold War Hot project did pretty well - with the following being added to my kit pile
3 Hasegawa M1 Abrams
2 Airfix 4 ton trucks
1 Airfix British 105mm gun set
1 JB Models 1 ton Land Rover
1 Trumpeter T-55 with Mine-roller
1 Trumpeter M2 Bradley
I also got some Liberation figures off Simon, plus a Liberation WMIK. Finally I managed to pick up another Dragon Leopard 2A4 and HMMWV with TOW, and a EasyModel (?) M113.
So all-in-all, I'm a pretty happy camper.
With the break I managed to re-read "Arc Light" by Eric L. Harry. I may try and knock out a quick book review - but I also got a copy of Kenneth Macksey book "first Clash" which I'm champing at the bit to read.
Finally, for my RAF regiment vs Spetsnaz mission, I managed to finish off an armed Land Rover. This isn't the actual finished version - but how I have finished it to enter a competition on the LibMin Board. Its a guntruck competition - so I hope this qualifies...
Here it is:


Not the best photos - so I quickly ducked outside and took these:


Its an Airfix LWB Land Rover - cut-down - with Liberation crew and a Liberation Milan mounted on the roll-bar. Bergens and Rolls are from Legend Productions and the cam net was made by me!
So anyway - I hope you all had a great Christmas and have a Happy New Year. This blog will continue - it may expand a little beyond its current Cold War Hot scope - mainly to cope with everything else that I tinker with - but I'm not 100% sure yet. I will start to add labels etc to make the blog more accessible, and soon give a year in review.
Take care and have fun...
Richard
I had a very nice Christmas, thank you very much and it was nice to have a few days off in a row.
Pressie-wise, the Cold War Hot project did pretty well - with the following being added to my kit pile
3 Hasegawa M1 Abrams
2 Airfix 4 ton trucks
1 Airfix British 105mm gun set
1 JB Models 1 ton Land Rover
1 Trumpeter T-55 with Mine-roller
1 Trumpeter M2 Bradley
I also got some Liberation figures off Simon, plus a Liberation WMIK. Finally I managed to pick up another Dragon Leopard 2A4 and HMMWV with TOW, and a EasyModel (?) M113.
So all-in-all, I'm a pretty happy camper.
With the break I managed to re-read "Arc Light" by Eric L. Harry. I may try and knock out a quick book review - but I also got a copy of Kenneth Macksey book "first Clash" which I'm champing at the bit to read.
Finally, for my RAF regiment vs Spetsnaz mission, I managed to finish off an armed Land Rover. This isn't the actual finished version - but how I have finished it to enter a competition on the LibMin Board. Its a guntruck competition - so I hope this qualifies...
Here it is:
Not the best photos - so I quickly ducked outside and took these:
Its an Airfix LWB Land Rover - cut-down - with Liberation crew and a Liberation Milan mounted on the roll-bar. Bergens and Rolls are from Legend Productions and the cam net was made by me!
So anyway - I hope you all had a great Christmas and have a Happy New Year. This blog will continue - it may expand a little beyond its current Cold War Hot scope - mainly to cope with everything else that I tinker with - but I'm not 100% sure yet. I will start to add labels etc to make the blog more accessible, and soon give a year in review.
Take care and have fun...
Richard
Senin, 15 November 2010
Finished the Week Long Project
Well - there you go... I finally managed to finish my week long project. At first I thought I had bitten off more than I could chew - then I thought I'd finish with time to spare - and then it took until tonight to get it all done to a wargaming standard. I hadn't actually planned on doing any figures, but did manage to finish 18 of them - so I'm pretty happy with that.
After this weekend's big game I'll come back to these and weather the vehicles and base the figures properly.
Here's some pics of the whole lot (I need to fiddle with the settings on the camera - its eluding me at the moment...)


T-72's - The Tank Collection (repainted) on the left, Cromwell models on the right

ACE models BMP's

Liberation BMD-1s and BMD-2s (some older? some newer I guess)

MMS 2S1

Liberation Soviet figures - dipped


Moving on to some British stuff now - to be ready by Saturday morning!!!
Have fun
Richard
After this weekend's big game I'll come back to these and weather the vehicles and base the figures properly.
Here's some pics of the whole lot (I need to fiddle with the settings on the camera - its eluding me at the moment...)
T-72's - The Tank Collection (repainted) on the left, Cromwell models on the right
ACE models BMP's
Liberation BMD-1s and BMD-2s (some older? some newer I guess)
MMS 2S1
Liberation Soviet figures - dipped
Moving on to some British stuff now - to be ready by Saturday morning!!!
Have fun
Richard
Selasa, 07 September 2010
British 1980's Infantry
Well, now for something non-Soviet for a bit of a change.
I always like to have some infantry finished before I try and tackle the forces vehicles. It doesn't always work out like that - but it's too easy to end up with a stack of cool tanks and MICVs and have no squaddies to do the actual fighting.
Hence I've been holding off on all my British kit, However, I recently came into the possession of some Liberation British figures and a single Platoon 20 chappie firing a Blowpipe missile. These rose very quickly to the top of my to-do list and hence here they are. The aim was to have them look something like this:

This image is taken from issue 2 of the Falklands War magazine and is of a British Paratrooper.
I also used the British DPM material as a guide (from my 28 April blog update) as well as this guide which I found on this excellent blog: Winter of '79
I didn't follow the tutorial word for word - but did find it very useful.
PAINTING
PAINTING
Once again my biggest concern the British DPM and I'm still not 100% sure of this lot, but at least it looks more like British DPM than US Woodlands. These were painted using my more traditional method.
If I had my tiem again I'd paint on the green cam swirls first and then the brown.
1. Black Undercoat – Citadel Spray
2. DPM Uniform – Base colour – Vallejo Khaki. Only the base colour was painted at this point.
3. Helmets – Vallejo Reflective Green (I think)
4. Flesh - Vallejo Flat Flesh
5. Webbing & Pouches - Vallejo Green Grey
6. Bren woodwork - Vallejo Beige Brown
7. SLR woodwork - Vallejo German Cam Black Brown
8. Weapon's metalwork - Vallejo Black Grey
9. The whole figure (excluding flesh) was washed with a Black magic wash
10. Highlight pretty much everything with original colours
11. Paint Citadel Ogyrn Flesh wash on all flesh and highlight with more Vallejo Flesh. )I then went back and added another wash over the top of this as well.
12. At this point I painted the DPM pattern over the highlighted DPM base uniform colour. The brown colour was done first – Vallejo Flat Brown is fairly large swirly like bits. Next was equally sized green swirls using Vallejo Luftwaffe Cam. Green. Finally thin lines of the black Colour using – Citadel Chaos Black. I followed the tutorial for this order - but if I had to do it again - or for the next lot - I'd do the green swirls first and then the brown
13. I highlighted the helmet scrim quickly using a Vallejo Khaki drybrush
12. Beret & Hair - I Vallejo Burnt Cad. Red for the beret and then on the one chap whose hair you could see I again used Vallejo Khaki - adding a bit of white for highlights.
Here are some pictures of the completed figures:

Platoon 20 Blowpipe chap

LibMin Signallers

LibMin chaps with Sterling SMGs

LibMin chaps with Bren guns

LibMin chaps with Gimpies

Libmin chaps with Carl Gustav MAWs


Pretty happy with these guys - not perfect by a long shot but good enough for me!
In honour of these guys being useable in either Cold War Hot games or Falkland Islands games I've decided to include the following youtube links:
Hope you enjoy this post
Have fun
Richard
I always like to have some infantry finished before I try and tackle the forces vehicles. It doesn't always work out like that - but it's too easy to end up with a stack of cool tanks and MICVs and have no squaddies to do the actual fighting.
Hence I've been holding off on all my British kit, However, I recently came into the possession of some Liberation British figures and a single Platoon 20 chappie firing a Blowpipe missile. These rose very quickly to the top of my to-do list and hence here they are. The aim was to have them look something like this:
This image is taken from issue 2 of the Falklands War magazine and is of a British Paratrooper.
I also used the British DPM material as a guide (from my 28 April blog update) as well as this guide which I found on this excellent blog: Winter of '79
I didn't follow the tutorial word for word - but did find it very useful.
PAINTING
PAINTING
Once again my biggest concern the British DPM and I'm still not 100% sure of this lot, but at least it looks more like British DPM than US Woodlands. These were painted using my more traditional method.
If I had my tiem again I'd paint on the green cam swirls first and then the brown.
1. Black Undercoat – Citadel Spray
2. DPM Uniform – Base colour – Vallejo Khaki. Only the base colour was painted at this point.
3. Helmets – Vallejo Reflective Green (I think)
4. Flesh - Vallejo Flat Flesh
5. Webbing & Pouches - Vallejo Green Grey
6. Bren woodwork - Vallejo Beige Brown
7. SLR woodwork - Vallejo German Cam Black Brown
8. Weapon's metalwork - Vallejo Black Grey
9. The whole figure (excluding flesh) was washed with a Black magic wash
10. Highlight pretty much everything with original colours
11. Paint Citadel Ogyrn Flesh wash on all flesh and highlight with more Vallejo Flesh. )I then went back and added another wash over the top of this as well.
12. At this point I painted the DPM pattern over the highlighted DPM base uniform colour. The brown colour was done first – Vallejo Flat Brown is fairly large swirly like bits. Next was equally sized green swirls using Vallejo Luftwaffe Cam. Green. Finally thin lines of the black Colour using – Citadel Chaos Black. I followed the tutorial for this order - but if I had to do it again - or for the next lot - I'd do the green swirls first and then the brown
13. I highlighted the helmet scrim quickly using a Vallejo Khaki drybrush
12. Beret & Hair - I Vallejo Burnt Cad. Red for the beret and then on the one chap whose hair you could see I again used Vallejo Khaki - adding a bit of white for highlights.
Here are some pictures of the completed figures:
Platoon 20 Blowpipe chap
LibMin Signallers
LibMin chaps with Sterling SMGs
LibMin chaps with Bren guns
LibMin chaps with Gimpies
Libmin chaps with Carl Gustav MAWs
Pretty happy with these guys - not perfect by a long shot but good enough for me!
In honour of these guys being useable in either Cold War Hot games or Falkland Islands games I've decided to include the following youtube links:
Hope you enjoy this post
Have fun
Richard
Jumat, 07 Mei 2010
More SAS
Alrighty - this is a test more than anything else.
I spent much of today trying to add a router to my home PC so I could access the internet from my Laptop around the house. After a fairly frustrating few hours I am noe typing this in on my Laptop sitting on the lounge - so something must have worked. I know this is no big deal fro most of you - but for me this is a big deal!
So on with the show...
As I may have stated earlier, I've written three scenarios for Ambush Alley Games for a new product that will hopefully be coming out soon. One of the scenarios deals with the adventures of an SAS Stay=Behind-Team.
I needed to paint two more SAS troopers to have all the SAS figures I needed for the scenario. One of these was a sniper, the other his spotter, armed with an M16/M203. Unfortunately I didn't own a sniper. However, Leigh Neville = gentleman and scholar that he is - had a spare and gave one to me.
PAINTING
Not much to report here as most of it has already been talked about previously. I did change the colours slightly on the chap with the M16/M203 - so for his DPM I used the same base colour as the others, but used Vallejo Beige and Beige Brown as the swirly colours. I think I like this one better, but it still isn't quite there.
The Ghillie Suit was actually really fun to paint - very simple - Vallejo Reflective Green, Citadel Babab Black wash - a drybrush of the original colour, and then I picked out a few of the indivdual strands with a couple of differnt greens and khaki.
Lets have a look at the photos:


Now just the sniper by himself:

That's all for now - I might come back and add in some more Ghillie suit photos on Monday.
Have fun
Richard
I spent much of today trying to add a router to my home PC so I could access the internet from my Laptop around the house. After a fairly frustrating few hours I am noe typing this in on my Laptop sitting on the lounge - so something must have worked. I know this is no big deal fro most of you - but for me this is a big deal!
So on with the show...
As I may have stated earlier, I've written three scenarios for Ambush Alley Games for a new product that will hopefully be coming out soon. One of the scenarios deals with the adventures of an SAS Stay=Behind-Team.
I needed to paint two more SAS troopers to have all the SAS figures I needed for the scenario. One of these was a sniper, the other his spotter, armed with an M16/M203. Unfortunately I didn't own a sniper. However, Leigh Neville = gentleman and scholar that he is - had a spare and gave one to me.
PAINTING
Not much to report here as most of it has already been talked about previously. I did change the colours slightly on the chap with the M16/M203 - so for his DPM I used the same base colour as the others, but used Vallejo Beige and Beige Brown as the swirly colours. I think I like this one better, but it still isn't quite there.
The Ghillie Suit was actually really fun to paint - very simple - Vallejo Reflective Green, Citadel Babab Black wash - a drybrush of the original colour, and then I picked out a few of the indivdual strands with a couple of differnt greens and khaki.
Lets have a look at the photos:
Now just the sniper by himself:
That's all for now - I might come back and add in some more Ghillie suit photos on Monday.
Have fun
Richard
Langganan:
Postingan (Atom)